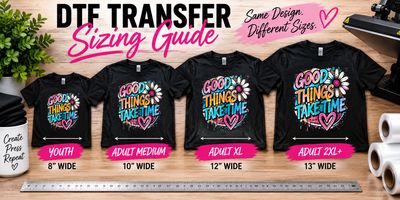
Here are some practical starting points when deciding how wide to make your DTF transfers.
Youth Shirts
A front design around 7–9 inches wide works well for many youth sizes. Smaller youth garments may need an even smaller design, so always compare the transfer to the actual shirt before pressing.
Adult Small–Large
For a standard full-front design, approximately 10–11.5 inches wide is a good starting range. The shape of the artwork matters too—a tall narrow design will look very different from a wide design at the same width.
Adult XL–2XL
Approximately 11–12.5 inches wide works well for many full-front designs. You may want to increase the size slightly when moving into larger garments so the artwork stays proportional.
Adult 3XL and Larger
Approximately 12–13.5 inches wide is a useful starting point for many designs. Don't automatically make the transfer huge just because the shirt is larger. Look at the printable area of the garment and the proportions of the artwork.
Left-Chest Designs
Most left-chest designs fall around 3.5–4.5 inches wide. Smaller adult garments often look good around 4 inches, while larger sizes may benefit from approximately 4.5 inches.
Hoodies and Sweatshirts
A front design around 10–12 inches wide works well for many hoodies. Remember that the pocket changes the usable printing area, so the design usually needs to sit between the neckline and pocket rather than being centered across the entire garment.
Back Designs
For standard adult back designs, approximately 11–13.5 inches wide is a good starting range. Names, numbers and team apparel may require different sizing depending on the layout.
Placement Matters Just as Much as Size
Even a perfectly sized transfer can look wrong if it’s placed too high or too low.
For a standard full-front adult design, starting approximately 3 inches below the collar is a useful guideline. From there, visually check the placement before pressing.
For hoodies, consider both the neckline and the top of the pocket. You want enough space around the artwork so the design doesn’t feel crowded.
Don’t Size Every Design the Same Way
One of the biggest mistakes beginners make is choosing one width and using it for everything.
Artwork proportions matter. A square design, tall design, wide design and circular design can all look completely different at 11 inches wide.
Instead of focusing only on the measurement, ask yourself: Does this design look proportional on this particular garment?
When possible, lay the transfer on the shirt before pressing. That quick visual check can prevent a lot of placement and sizing mistakes.